Let’s be honest, there isn’t a whole lot new to say about granola. It’s not as though I’ve come up with some shockingly revolutionary way to make it, or some secret superfood ingredient that makes all granola healthy. Instead, I’m here to explain my simple three-question decision-making process for making something instead of buying it. It definitely applies to granola, and hopefully, you’ll apply this theorem to your own cooking and baking.
The three questions are as follows, and can be applied to pretty much any food or drink item, in my extensive experience:
- Can I make it cheaper?
- Can I make it healthier?
- Can I make it taste better?
Certain items, like bread or jerky or hummus or jam or yogurt, are an automatic yes, at least for us. Others, like kombucha or crackers, might get two of three (cheaper and healthier), especially if there are specific storebought products you really like. And then there are the tricky ones, the ones that take years to master, the ones even I don’t tackle. This list is intensely personal, but for me it includes high-level precision fermentation: most ripened and aged cheeses, plus beer, wine and liquor. Yes, I could theoretically make any of these, but other people are doing it better, and I’d rather devote my kitchen experimentation time to other things. I’m happy to leave these to the professionals.

When it comes to granola, however, I see no reason not to make it at home. Your granola will, without a doubt, be healthier, better-tasting and for certain cheaper than anything you can buy in the store. Even better, it will be customized exactly the way you like it.
Most granola starts with a base of plain oats, which are healthy enough on their own. In bulk, they typically only cost about seventy cents a pound, depending on where you shop. And most premade granola that I’ve seen, even in bulk, is at least $4 a pound; ridiculously fancy high-end stuff is often ten dollars or more a pound. That, friends, is just silly. You’re paying ten times as much for something that’s not as good, and the ingredients are questionable at best. You don’t even want to know how much cheap sugar and soy and corn is in that glossy, overdesigned bag. Let’s get granola-ing, shall we?
The internet abounds with both cat videos and granola recipes; somewhere, I’m sure those come together magically in a single post. I will not search for that post. The point is, there are ten million ways to make granola, all of them probably delicious and none of them unique to you. So figure out what you like about granola, and do that. Figure out what you don’t like, and eliminate that. Pretty simple.
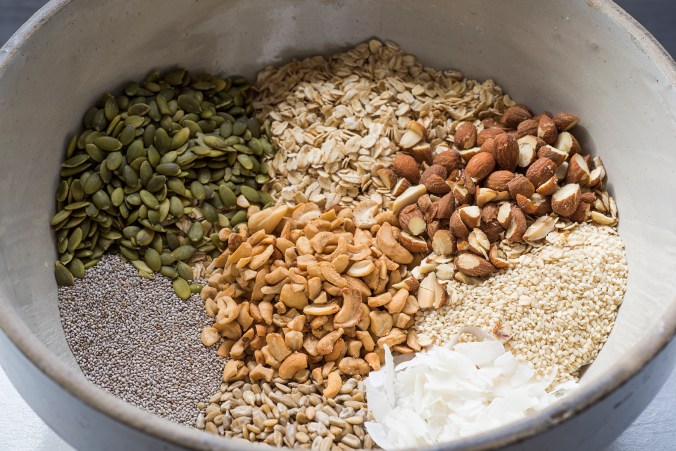
For my House Granola, I want lots of nuts and seeds for texture, crunch, healthy fats and satiety. Nuts and seeds are substantially more expensive than oats, which is why even storebought “almond granola” seems not to have much in the way of actual almonds (but plenty of artificial “almond flavor”!). I also want very little if any sweetener, because I want to add sweetness in the form of fresh/dried/canned fruit, jams and preserves and a drizzle of our own honey. I want my granola to be deeply toasted – one could say on the edge of burnt – almost savory and packed with flavor and nutrition. I don’t want to eat pale, flaccid oats and other unidentifiable junk sweetened with corn syrup. And if I’m going to take the time to make granola, I’m going to make a big batch that will last for weeks.

No matter what recipe you use, over the years I’ve identified a few tips that will help make your own housemade granola better. Number one: if you’re going to use any kind of dried fruit, never, ever add it until the granola is finished baking and has cooled completely. This is very important, unless you are committed to buying your dentist a Tesla. Two, use raw, untoasted nuts and seeds. I buy all of my granola ingredients in the bulk section; always go raw for granola since you’ll cook it. (You can control the salt content better this way, too.) And three, never trust any recipe’s recommendation for baking times. Depending on the size of the recipe and how many sheet pans you’re using, plus the impreciseness of your oven, you’ll need to babysit this recipe the first few times. This isn’t to say you need to have your face stuck to the oven door for hours, but do other things in the kitchen at the same time so you can check on your granola frequently. Maybe prep healthy meals for the week?

I like using liquid fats (olive oil, coconut oil) and liquid sugar (honey, maple syrup) in my granola. Although I appreciate big granola chunks, I resent suggestions to use a single egg white to form those chunks, simply because I abhor recipes that leave just a bit of something behind, like a quarter-cup of canned pumpkin or an egg yolk. Those sad remainders just get abandoned in the fridge to die, and we all know it. So for me, no egg white unless there is a batch of fresh pasta in my immediate future, because that will take about as many extra yolks as you can throw at it.
I make my granola like this: combine dry ingredients, including nuts and seeds (but not dried fruit) in a large bowl and season generously with salt. Combine all liquid ingredients and warm gently in a small pan so they meld into a smooth, homogenous mixture. Pour wet over dry, blend well, and spread on parchment-lined baking sheets. Toast gently but thoroughly at 300 degrees, rotating as needed, until cooked to my liking. This takes a while; I make a lot and I want it toasty. Let cool. Store in airtight container in pantry. Magic, right?

If you need a little more guidance, start with this simple, flexible small-batch recipe from my supremely talented and inspiring sister, who made this her own. Remember, this is more of a suggested route rather than a hard-and-fast recipe; adjust as you see fit. And please, report back on your research.
Sara’s Coconut-Almond Granola: Preheat oven to 325 degrees. In a large bowl, combine 2 cups rolled oats, 1 tbsp. chia seeds, 1/4 cup chopped almonds, 1/4 cup flaked coconut, 2 tsp. cinnamon and 1/2 tsp. salt. In a small pan, gently warm 1/3 cup coconut oil with 1/4 cup maple syrup or honey. When smooth and combined, remove from heat and add 2 tsp. vanilla. Pour liquid over dry ingredients and stir well to coat. Spread evenly on a parchment-lined baking sheet and toast, turning as needed, for about 20 minutes or until lightly golden. Cool completely and add 1/4 cup dried fruit, if desired. Store in an airtight container at room temperature.
Want more granola inspiration? Go here, here or here.

THANK YOU for the tutorial on granola! Frankly, I had been buying an organic brand that sells both grain free granola and a grain nut/fruit variety. It is so expensive. I will now attempt to make my own- if I want to add some ‘superfood’ components e.g. chia, hemp etc. I’ll just add them. I bet when it is baking it makes the house smell lovely as well. Thanks again. Karen L.
LikeLike
Thanks, Karen! Please let us know how your granola turns out!
LikeLike
I use a flax egg to get the big granola chunks. Inexpensive and no waste!
LikeLike
That’s a terrific idea! For readers who may want to try this: combine 1 tbsp. ground flaxseed meal or 1 tbsp. chia seeds with 3 tbsp. water. Mix well and let sit for fifteen minutes to thicken. This egg substitute doesn’t work in all recipes calling for eggs (souffles or fritattas would be tricky), but it does work in many of them. And no excess yolk to use up. Thanks so much, Kristen!
LikeLike
I love granola but so many store-bought varieties have the “health halo” and are loaded with sugar, hence why I make my own. Thanks for sharing my recipes! XOXO
LikeLike
Health halo for certain! Yogurt and granola and “energy bars” are the worst offenders, as far as I’m concerned. Thanks for the recipe, Sara!
LikeLike
I’ve been making my granola with orange oil (not extract, but pure oil) added into the melted coconut oil and syrup mixture, and there is no going back! Amazing flavor.
Your new floors are beautiful!
LikeLike
Kelly, I love hearing how everyone makes their granola. Orange oil sounds delicious; I love citrus flavors in just about everything. Thanks for reading!
LikeLike
Pingback: A fresh start | Finding Quiet Farm
Pingback: How to make hummus | Finding Quiet Farm
Pingback: Farm update: March 9 | Finding Quiet Farm
Pingback: Farm update: July 20 | Finding Quiet Farm
Pingback: Fight inflation in the kitchen | Finding Quiet Farm