The humble muffin

Let it be hereafter known to all and sundry that I am not cool. I am definitively not trendy. The only time in recent memory I’ve been on-trend is when activities I’ve cheerfully pursued for years – baking bread! sewing! growing food! raising chickens! – happened to intersect neatly with a (hopefully) once-in-a-lifetime pandemic. All of a sudden, my previously-mocked Laura Ingalls Wilder skills were wildly in demand. All of a sudden, I was cool.

Sadly, it looks as though my coolness has worn off as we tentatively, gradually, carefully tiptoe back to our “real” lives. Most people have given up on sourdough, everyone is wearing cheap counterfeit N95s, gardening is probably finished and I don’t want to think too hard about what happened to all those pandemic chicks. My point here, if you were wondering, is that I am once again proudly not cool and I am still baking muffins.

Homey. Comforting. Just what we need right now.

Muffins are not cool, either. They are not a cronut or a cake pop or a brookie or a rainbow layer cake. I am doubtful that muffins have a massive following on Instagram. Perhaps there have never been muffins on Instagram? I’m pretty sure no one has made a fortune off of them recently. They’re just…muffins. They’re humble and comforting and kind and homely and they’re basically just a hug from your grandmother in pastry form and therefore they’re perfect for this weird purgatory we all find ourselves in, where things are sort of looking up but the pandemic definitely isn’t over and we haven’t exactly leaped into normal life again. It’s an odd, unsettled time, to be certain.

If I haven’t sold you on muffins yet with that confusing pitch, allow me to continue proselytizing: muffins are far and away one of the simplest things you can bake, even at altitude. They’re infinitely customizable with whatever you might have lurking in the freezer or pantry. You can use up fruits or vegetables that might otherwise get thrown out. It’s easy to make them reasonably healthy, and they freeze like a dream. What more could you ask from a baked good, honestly?

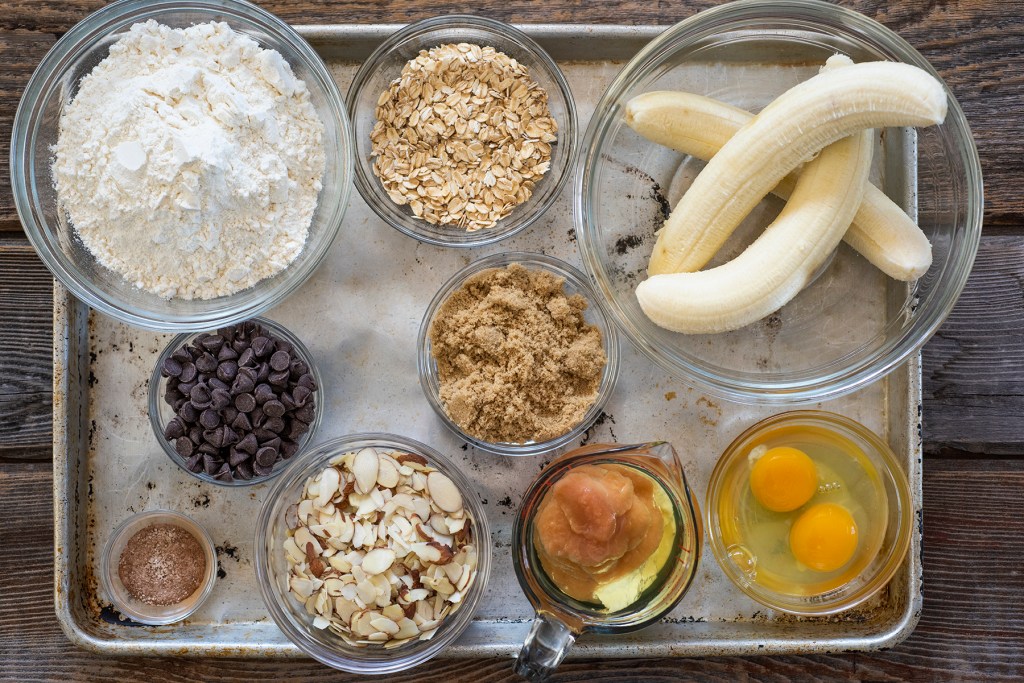
Get your mise-en-place together first!

Gather round, children, and I’ll share my own personal hard-and-fast rules for muffins. You might want to take notes! First and foremost – and I’m going to say this loud for the people in the back – MUFFINS ARE NOT CUPCAKES. Did everyone hear me? I abhor the standard Costco-style blueberry muffin which has forty grams of sugar and may as well be a dessert. That is not an acceptable muffin – my limit is one-half cup of sugar in a twelve-muffin batch. With natural sweetness from whatever fruit I’m using, plus a bit of turbinado sprinkled on top for crunch, that’s plenty sweet. There’s simply no need to eat that much sugar for breakfast or any time of day, really.

Second, I much prefer baking muffins fresh first thing in the morning, and fresh muffins are much easier when all of the ingredients are prepped the night before. How can you manage this neat pro trick? Whisk together the dry ingredients in a large bowl, and leave covered on the counter. Combine wet ingredients in another lidded container and refrigerate overnight. In the morning, gently fold wet and dry together and bake. By the time the coffee is finished brewing, the muffins are practically ready. Simple and effortless and especially useful if you have overnight guests, if that will ever be a thing again.

Wet ingredients (back left) will overnight in the fridge, dry ingredients on the counter.

A few other muffin-making tips: even if you choose to prep your ingredients the night before, never mix wet and dry together until just before you’re ready to bake. The leavening agent – in this case, baking soda – will be activated by the acidic yogurt and will start a chemical reaction. If you combine the batter and let it sit without baking it, you’ll likely get no rise and a bitter, metallic flavor. Wet and dry always stay separate until the last minute.

When combining wet and dry ingredients in a muffin or quick bread batter, it’s imperative not to overmix. You only want to fold things together until it’s mostly homogenized; a few streaks of flour are not an issue. Muffins and quick breads do not benefit from vigorous mixing, as this activates the gluten strands and toughens the crumb. Gentle is the way forward here.

I love using fruit purees in muffins, including but not limited to overripe bananas, home-canned applesauce, and unsweetened jam. Whenever a recipe calls for overripe bananas, they should be well-speckled or even fully brown; as they ripen, the natural sugars intensify so you’ll achieve sweeter flavor without extra sugar. If you’ve got overripe bananas but no plans to bake soon, peel the bananas and freeze on a sheet pan lined with waxed paper, then store in a zip-top bag. You can pull out the amount you need, and they’ll soften quickly – plus less food waste!

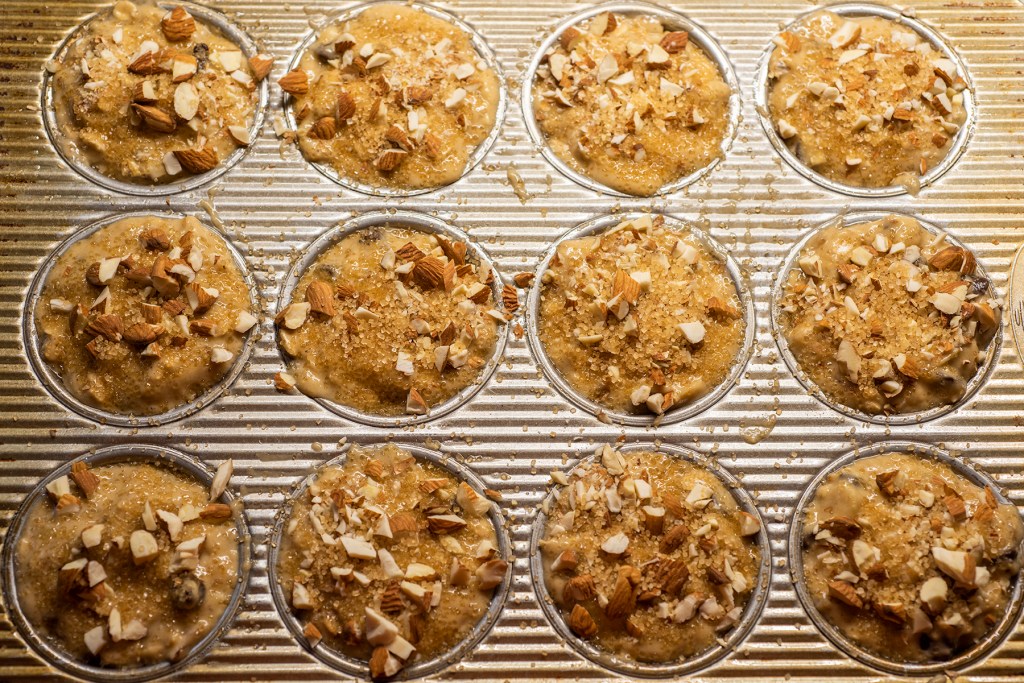
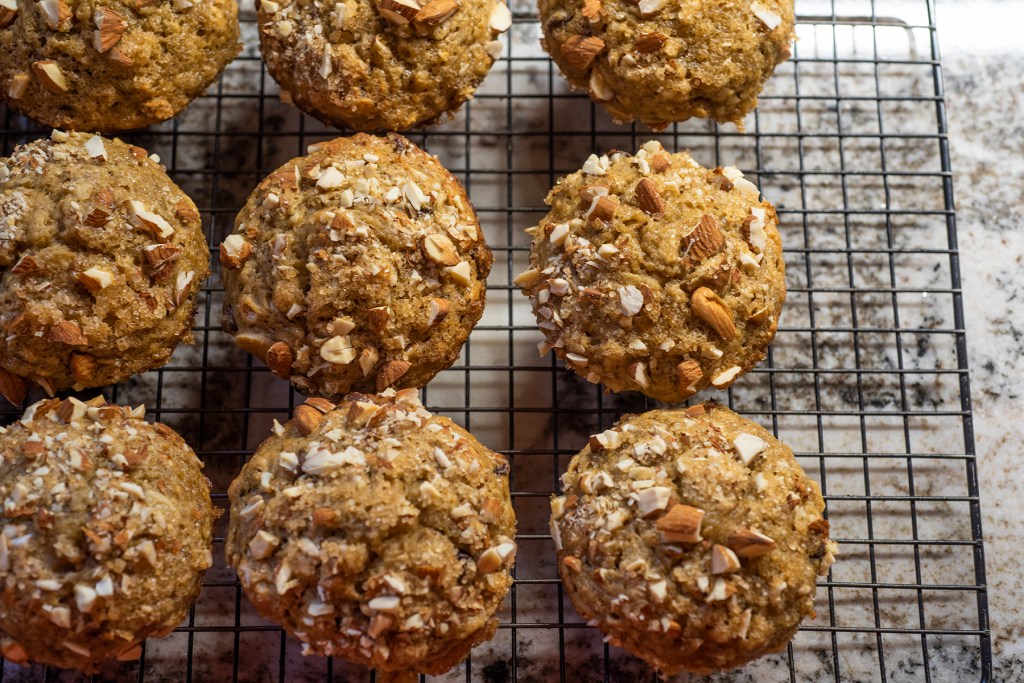
I fill the muffin cups to the rim, then sprinkle with turbinado and chopped nuts before baking.

When the muffins are fully baked, get them out of the pan immediately and set them on a cooling rack. Most baked goods (with the exception of a few delicate cakes) should be removed from the baking pan as soon as possible, and allowed to cool with good air circulation so the bottom crust doesn’t become soggy from heat and moisture. If you don’t have a cooling rack, grab one of the wire racks from the oven and use that instead.

Though muffins, like most pastries, are at their best the day they’re baked, they do freeze surprisingly well. I freeze cooled muffins on a sheet pan; once solid, they’re tucked into a zip-top bag to enjoy throughout the week. Since the muffins are small they’ll thaw quickly at room temperature, but thirty seconds in the microwave can speed that process along, if necessary.

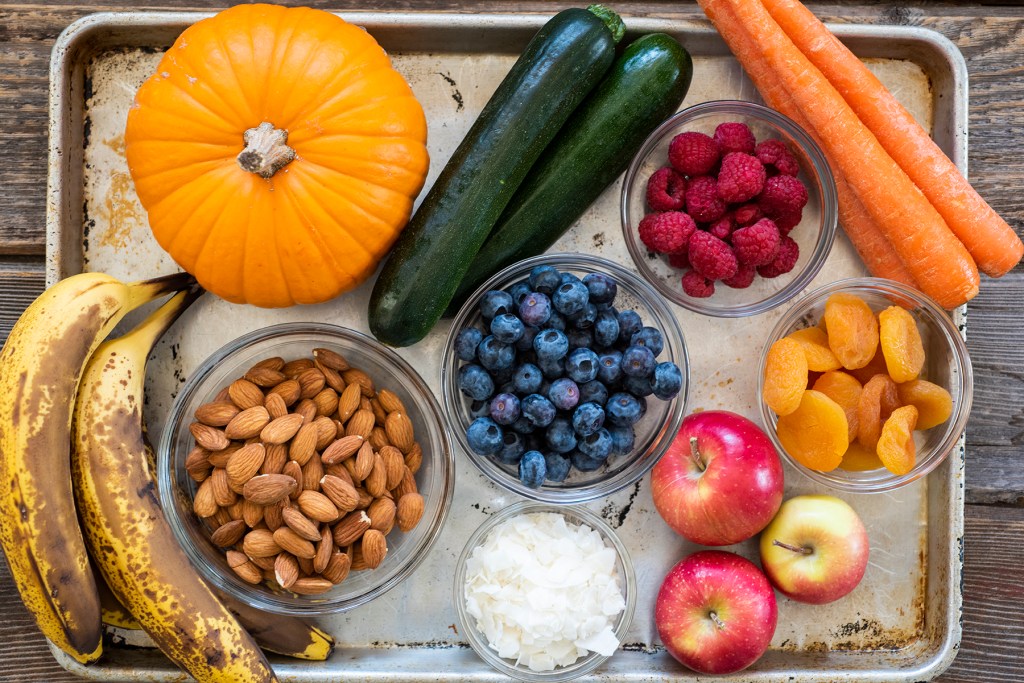
Just a few ideas for what you can use in your muffins!

I use a basic muffin recipe that works well at 6,300 feet, and I customize it according to what I have on hand. Dry ingredients: two cups all-purpose flour (you can sub out up to half with spelt, whole wheat, or white whole wheat), 1/2 cup rolled oats, 1/2 tsp. salt, 3/4 tsp. baking powder (leavening agents are typically reduced at altitude), 1/2 tsp. cinnamon, 1/2 cup chopped nuts, 1/2 cup dried fruit. Wet ingredients: two eggs, 1/2 cup brown sugar, 1/3 cup neutral oil (such as grapeseed), 1/3 cup unsweetened applesauce, 1/3 cup yogurt, milk or buttermilk, 1 to 1 1/2 cups mashed banana, pumpkin puree, shredded zucchini and carrot, or other fruit and vegetable combination (adjust liquidity as needed). Bake in a preheated 425-degree oven for five minutes, then lower the temperature to 400 degrees and bake for about another twelve minutes, depending on your oven. (My oven has notorious hot spots, so I rotate the tray at least once. You know your oven best; adjust accordingly.)

Muffins are pretty forgiving; if you bake a lot, as I do, you’ll learn to adjust the liquidity in the batter. Mashed bananas generally won’t require additional liquid, but if you’re just using chopped fresh fruit or vegetables, like apples or carrots, you might need a bit more yogurt or milk. If you find your muffins to be either overly mushy or overly dry, you’ll know to adjust for next time – and that’s how you get better.

Some of my favorite tried-and-true flavor combinations: apple cinnamon walnut :: banana chocolate almond :: blueberry coconut vanilla :: zucchini carrot apple raisin :: pear pecan ginger :: peach coconut macadamia :: raspberry apricot :: pumpkin hazelnut raisin. There are a million more variations possible here, with a little experimentation.

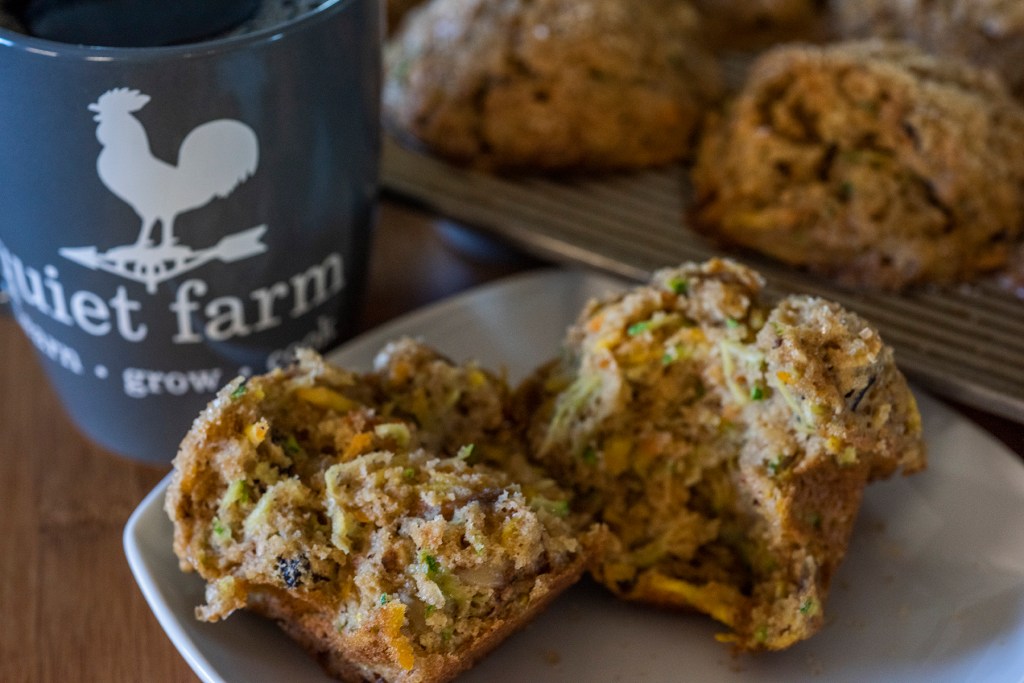
Wishing you plenty of strong, hot coffee and fresh, uncool muffins this week, dear friends.

P.S. If you’re one of my treasured bakery regulars, please immediately forget everything you’ve just read. There’s no way you can possibly make these at home. Muffins are really super difficult and complicated. Just keep ordering from me.

Make a plan

I think we can all agree that the World Wide Web is, for the most part, a fetid swamp of horrors. But! On rare occasions, the Internet can produce some magic, too. Helpful sewing tutorials! Funny commercial parodies! Everything useful we’ve learned on YouTube about how to renovate a house! And above all else, there is the Grub Street Diet from New York magazine, which is very hit-or-miss – but when it’s on, there’s nothing better. (See this fabulous example.) I absolutely adore food diaries, and if someone combined a daily food diary with a personal finance diary and threw in some quilting tips for good measure I’d probably never read anything else ever again.

Here’s the thing: as someone who has spent the vast majority of her life thus far working with food, thinking about food, reading about food and generally obsessing over food, I need to know what everyone is eating at all times. And also why you’re eating that particular thing. Are you enjoying it, or just eating it because it’s there? Are you even hungry right now? Did you make it or buy it or was it made for you? Did you plan on eating it? Did you seek it out? Would you eat it again? And that brings me neatly to my next question: do you plan your meals?

No need to plan: we eat this lovely breakfast every single day.

One might argue that this question was more relevant pre-pandemic, when Americans ate well more than half their meals outside the home and our schedules were totally different. Of course, since the world stopped eleven months ago, our eating and cooking habits have altered pretty dramatically. One thing that hasn’t changed, though – and I know I have some audience support on this one – is that dinner still, for no apparent reason, happens every single night. How and why this metaphysical error is possible I cannot explain, as each afternoon around 4:30PM I invariably think, “Didn’t I just make dinner?” This situation is particularly embarrassing, of course, because a) I am a professional chef and making dinner really shouldn’t be quite so challenging and b) I voluntarily never leave our gorgeous farm and so if dinner doesn’t appear I can’t even come up with a reasonable excuse about traffic or working late or some such. I’m here, and I’m available, and I have the time, and still, dinner regularly takes me by surprise.

For the record, we didn’t eat out or order delivery even pre-pandemic. In the nearly three years that we’ve lived here, we’ve eaten out precisely once, and in our rural area I’m not even sure where you would get take-out or delivery. (DoorDash is not exactly staking its business success on our county.) So that means we eat all our meals at home, like much of the world these days, and that means not losing interest in your own cooking. It’s a tough challenge, even for a professional chef.

The makings of a stir-fry.

In my years teaching cooking classes, I’ve learned that most households tend to be on about a ten-day rotation of standard meals, which accounts for a few nights of leftovers or take-out in a two-week period. I can completely understand wanting to grab for those “known quantities,” meals that will please everyone without too much time and effort. There are few things more heartbreaking to a dedicated home cook than hours spent slaving away over a spectacular new recipe, only to have your loved ones politely ask you to please, please never make that again. (Looking at you, ma po tofu.) If spaghetti bolognaise works, and you’re tired and hungry, and everyone else is tired and hungry, why not just have spaghetti bolognaise, even though this is the third time in two weeks? Just about everyone can relate to this familiar situation.

Curry-roasted sweet potatoes, pilau rice, fresh naan and salad.

Even in our calm household, which does not have the added complications of varying sports schedules or child care issues or long commutes, I’ve found that planning meals in advance makes a huge difference in how I view the daily chore of dinner. Knowing what I have in the fridge, freezer and pantry, and what meals I can compose from those ingredients, is essential. This is especially true because our “big” grocery store (in a relative sense) is nearly twenty miles away, so we grocery shop infrequently. In a rural county, I don’t have the luxury of running to the store for a bunch of cilantro or a box of pasta fifteen minutes before serving, so we keep a very well-stocked kitchen.

Breakfast tacos are a household staple – usually for dinner.

I also make an effort to cook in batches, so if I’m making a roasted pumpkin soup with coconut and ginger, I’ll make a big pot of it and freeze it in quart deli containers for a quick and easy meal. I make batches of “components,” too – versatile prepped foods, like steamed brown rice, beans, hard-boiled eggs, roasted potatoes or sautéed peppers and onions – that can be utilized in a variety of different meals. Of course we also can and freeze lots of our farm produce, too, but as N famously once said while staring at a packed fridge: “There isn’t any food in here. Just ingredients.” Joking aside, his point was that there was nothing ready to eat, and even the best cook can sometimes look at a full pantry and feel no inspiration whatsoever. That’s when a list of favorite recipe ideas pinned to the side of the fridge can come in handy.

Chickpea smash on toasted focaccia is another favorite in heavy rotation.

The classic American meal typically starts with a protein as the main course – mostly chicken breasts or ground beef. Occasionally a steak, or salmon, or maybe something exotic like shrimp or scallops. A starch and a green vegetable might be on the plate, but they’re side dishes, merely afterthoughts. Here, though, we eat meat barely once or twice a month, and seafood never, so we start with vegetables or legumes, and build from there. We frequently eat stir-fries; they’re quick and easy to pull together. Lots of spicy, warming soups, especially in the colder months. Roasted vegetables feature regularly as do variations on curries. We eat eggs for dinner, usually as breakfast tacos, and many, many incarnations of flatbreads are consumed here. Pasta is a stalwart; loaded with vegetables, it doesn’t deserve its unhealthy reputation. Warmer weather brings lots of main course salads, packed with grains and eggs and myriad vegetables. And sometimes, we just have “snack plate dinner,” which is pretty much exactly what it sounds like: cheese, crackers, vegetables with hummus, good toasted bread with a variety of dips and spreads and anything else that can be used up in the fridge.

My meal planning starts with cookbooks, magazines, a recipe idea file and a pantry inventory.

I will freely admit that strict meal planning doesn’t happen every week; sometimes it’s a bit more impromptu. The weeks when I do write a meal plan, however, absolutely feel much calmer and easier and less stressful than when I don’t. But if we lived in a stereotypically frenetic American household, with lots of people running hither and thither, and various schedules to manage, a meal plan would be an absolute necessity for maintaining order. Here, though, we eat lots of plants and do our best not to waste any food – and a weekly menu plan helps make that happen.

So please share, dear friends: do you plan your meals? Do you stick to the plan? Do you have tried-and-true favorites, or are you regularly tucking in new experiments? Do you do all the cooking, or do other members of the family pitch in? This avid Grub Street Diet reader is longing to know!

Interlude: How chocolate is made

Can’t speak for your household, friends, but we need a break from the winter doldrums over here. I’d claim that it’s all grey and gloomy outside – typical February weather – but the truth is, it’s bright and sunny and windy and disturbingly warm and snow-free for this time of year. Our “exceptional drought” is no longer exceptional, it’s just the way things are now. (Or to throw down an overused phrase from 2020: it’s the “new normal.”) Our town has pre-announced water restrictions, as have many cities on the Front Range. We’re hoping for some moisture later this week, but this late in the season it’s highly unlikely we’ll make up the deficit.

To that end, we’re going on a tropical vacation. Of course I mean this metaphorically, not literally! We haven’t traveled in well more than a year, and have no plans to do so anytime soon. A couple of years ago, however, we went on a chocolate trip to Belize where we learned about the process of making chocolate from bean to bar. And so, let’s imagine that we are all calm, warm and relaxed in the tropics and that everything is right with the world.

Cacao trees are a tropical plant, typically reaching fifteen to twenty-five feet in height.

All chocolate comes from cacao trees (Theobroma cacao) which only grow in a limited geographical range: about twenty degrees north and south of the equator. This tropical belt is also where you’ll find coffee and lots of delicious fruits, like pineapple, guava, papaya and many more (coffee and chocolate are both botanically fruit). Most of the world’s chocolate comes from Africa, but a small amount is produced in Latin America.

Cacao pods are about eight inches in length, though the size depends on variety and climate.

Cacao pods are ripe when they turn a bright yellow-orange color. Not all the pods ripen at the same time, so the trees are usually harvested continuously throughout the year.

The pulp encasing the beans is often used to make a fermented drink.

Once harvested, the seedpods are opened and the cacao beans removed. The beans are surrounded by a white pulp called baba, which tastes fresh and fruity.

The smell of the fermenting cacao beans is intense and amazing.

The beans are cleaned of most of the baba and left to ferment for about a week. (Exposure to light turns the pale, creamy beans a darker violet color.) In Latin America, the fermentation is most often done through a simple yet elegant series of cascading boxes; in Africa, beans are typically fermented in piles on the ground.

Checking for readiness.

Fermenting cacao beans are sliced open regularly to determine the degree of fermentation. It takes a great deal of skill and knowledge to know when the beans are perfect.

Drying beans need tropical heat but not tropical moisture.

After fermentation is complete, the cacao beans are dried. This is an important step; if the beans are shipped with excess moisture, they’ll spoil in transit. Enormous covered drying barns are used, and the beans are turned regularly to ensure even drying. The tropical weather can make this step challenging.

Ready for transport.

Once the beans are completely dried, they’re sorted, graded and shipped to wholesalers or chocolate manufacturers. Belize produces a very small amount of cacao relative to other countries, but the cacao is of a spectacularly high quality.

Grinding cacao nibs into chocolate paste.

When the cacao beans arrive at the manufacturer, they’re inspected and cleaned again. The whole beans are roasted at low temperatures to bring out flavor (much like coffee beans), then the shell is separated from the nib (the “meat” of the bean) by winnowing. (Cacao shells are frequently used as garden mulch.) Grinding pure cacao nibs yields “cocoa mass”; applying high pressure to this cocoa mass produces cocoa butter and cocoa powder.

Conching chocolate is a complicated process of aeration, blending and kneading.

The chocolate we eat is made from cocoa mass with other ingredients added in, including additional cocoa butter, emulsifiers (most commonly soy lecithin) and sweeteners. True dark chocolate doesn’t contain any milk solids, whereas milk chocolate obviously does. White chocolate is most often cocoa butter, sugar, palm oil and soy, with no cocoa mass, and as such isn’t technically chocolate. That percentage on the label of a chocolate bar tells you the chocolate-to-sugar ratio: a 70% bar, for example, contains 30% sugar. The higher the percentage, the less sugar and therefore the less sweet the chocolate. Unsweetened chocolate is 100% cocoa mass with no sugar whatsoever; terms like semisweet and bittersweet have no defined meaning.

Finishing chocolate bars with toasted coconut.

After the chocolate is thoroughly conched, it’s tempered and molded. Tempering chocolate is a finicky process that involves carefully warming the mixture to the perfect temperature, then holding it there for a prescribed period. Tempering stabilizes the cocoa butter molecules, and gives premium chocolate its snap and sheen. (If you’ve ever opened a chocolate bar to find white spots on it, fear not – it’s simply the cocoa butter rising to the surface. It’s called bloom and is totally harmless.) The tempered chocolate is poured into molds and chilled to produce its final form, then packaged for sale.

As with all our food, chocolate production is a complicated and troubled subject. Most chocolate in the world is grown and manufactured under terrible conditions and is kind neither to the planet nor the workers involved. Spend a little more on your chocolate – look for single-origin and direct trade! – and avoid any with palm oil or soy lecithin, both of which are environmentally devastating. As a rule, chocolate from Latin America is a better choice than that from Africa. Quality chocolate costs more for good reason: read the labels and vote with your dollars.

Wishing everyone an imaginary tropical vacation this week, or at least some good chocolate.

A sweet treat

We’ve been honest about the fact that we don’t eat many sweets here at Quiet Farm – our tastes definitely lean more towards the salty and savory. That said, when we do have a sugar craving, we’re seeking something spectacular, rather than something merely mediocre. Dry, tasteless storebought cookies? No thanks. Artificially sweetened plastic-wrapped gas station pastries? Absolutely not. Homemade millionaire’s shortbread with a hot cup of coffee? Yes, please.

What’s that, you say? You are an American raised on Twix bars and you have never in your lifetime heard of this mysterious thing called millionaire’s shortbread? Well, please allow your intrepid guides to introduce you to this magical sweet. The name millionaire’s shortbread apparently originates in Scotland (totally unverifiable), and refers to the unbelievably rich layered combination of shortbread crust, sticky-sweet butterscotch caramel, and chocolate. The confection, also known as caramel slice, caramel shortbread or caramel shortcake, is well known in Britain and Australia but not so much here in the U.S. (Unless of course it’s packaged and called a Twix bar.)

This version, lightly adapted from this Bon Appétit recipe, is jokingly referred to as billionaire’s shortbread because it incorporates both whole sesame seeds and tahini, exotic (and somewhat pricey) ingredients. Tahini is simply sesame seed paste, and it’s commonly found in savory Middle Eastern cooking – notably hummus. Of late, however, many pastry chefs have started incorporating it into desserts, and I am all for this trend. There is no denying that millionaire’s shortbread is almost teeth-achingly sweet, with the decadent combination of shortbread, caramel and chocolate, and the tahini (as well as the toasted sesame seeds in both the shortbread and sprinkled on top) cut that richness. I like the crunch, the textural contrast, and the slight bitterness the sesame seeds bring to the party.

Pre-made tahini is surprisingly costly to purchase, but it does keep forever if refrigerated and it is a terrific addition to salad dressings, bean dips and certain baked goods. If you are the sort of person who already makes your own nut butters, preparing your own tahini will be an easy step  – simply puree raw sesame seeds in your high-powered blender much as you might almonds or peanuts. As with all nut and seed butters, tahini is likely to separate after a time, so always give it a good stir to re-incorporate the oil that might have settled on top.

Tip the crumbly dough into the pan, then press into an even layer and pierce with a fork.

Ready to tackle this? Let’s go. As always when baking and cooking – especially when you’re trying a new and/or complicated recipe – it’s super-helpful to put together your mise-en-place, which is a simply a fancy French culinary term meaning “to put in place.” I like to use the glass bowl set shown in these photos to assemble all of my ingredients; setting things up in this fashion also helps if you get distracted midway through, because you can see at a glance if you’ve added all of the required ingredients. “Did I add the salt yet, or not?” is not generally conducive to successful baking.

If it’s your first time making shortbread, here are a few tips: 1. Make sure your butter chunks are good and cold; I chop the butter then pop it into the freezer until I’m ready to use it. 2. Don’t overmix the ingredients; they won’t be homogenized (see bits of golden yolk above) and that’s just fine. 3. When you press the dough into the pan, use some effort so it stays together when you cut it later. (Also, please note that the binder clips in the photo above are simply used to keep the parchment paper in place while preparing the dough. They do not go into the oven!)

Once your shortbread crust is baked and cooled, you’ll pour the caramel layer on top. This recipe calls for a simple caramel that doesn’t require a candy thermometer, but caramel still takes a bit of experience. Whenever you’re making any caramel, use a larger, deeper pan than you think is necessary, because the mixture always wants to boil over. Remember that if you’re baking at altitude you actually want to cook the caramel a bit less, since the lower air pressure means that water boils at a lower temperature here (and water evaporation is key to making successful caramel). Also, caramel (and candy-making in general) really isn’t a kitchen activity for kids; the risk of severe sugar burns is pretty high if you’re not careful.

No no no! Don’t do it like this!

Here’s a pro tip: make absolutely sure that the caramel layer is thoroughly chilled before you pour the melted chocolate on top. In the photos above, you can see that the chocolate is actually sinking into the caramel, rather than spreading out smoothly. Do not skimp on chilling the caramel and shortbread; you can even tuck it in the freezer for a few minutes, just make sure to keep the pan level so all the warm caramel doesn’t slouch to one side. And when you’re melting chocolate, avoid using chocolate chips. These are specially formulated not to melt, since their whole point is to stay whole in cookies and the like. Buy a stash of good-quality chocolate bars and when you need melted chocolate for a recipe, chop into chunks and melt gently in a glass bowl set over a pan of simmering water. (I am not a fan of melting chocolate in the microwave; I think it runs the very real risk of burning the chocolate.)

This happens surprisingly quickly! Don’t walk away.

Any time you use nuts or seeds in any format, be it in baked goods, sprinkled on a salad, or in trail mix, know that they’ll be much more flavorful if toasted first. Many recipes call for using the oven to toast a sheet pan of nuts or seeds; from long experience, I can tell you that this is a great way to burn twenty dollars’ worth of pecans. I always, always dry-toast my nuts and seeds in a shallow frying pan on the stovetop, where I can babysit them carefully. Depending on the variety, nuts and seeds can go from pale and raw to charred and ruined in a matter of seconds, and the oven doesn’t allow me enough control. Also, once the nuts and seeds are toasted to the level you’d like – taste them! – make sure you transfer them from the hot pan to a plate and let them cool completely. There will be enough residual heat in the pan to keep on cooking, and you might find they’re burnt anyway.

Almost ready to enjoy…but needs some salt on top.

Once you’ve poured and smoothed the melted chocolate, the pan goes back into the fridge for a final set. Feel free to sprinkle with flaky sea salt in addition to the toasted sesame seeds, if your fancies swing that way. When you’re ready to cut the millionaire’s shortbread, gently lift the entire mess out of the pan using the parchment paper as handles, and set on a cutting board. Use a serrated knife and saw into small squares; a chef’s knife, no matter how sharp, will press down on the bars and cause the caramel to squish out.

These are unbelievably rich and sugary, and you really only want a tiny piece. We keep ours in a covered container in the fridge for better texture and longer shelf life; I actually cut the entire tray into tiny squares and freeze most of them, so we can have a small treat as and when circumstances call for it. Millionaire’s shortbread isn’t an everyday pleasure, but it’s lovely to have a little bite of something sweet every so often.

So rich! So delicious! Enjoy with strong, hot coffee.

Have a good week, friends, and perhaps bake yourself a treat, too.

P.S. If you’re not feeling the tahini in this variation, you can find a more traditional millionaire’s shortbread here, here or here. Please note that we have tested none of these!