Crantastic!

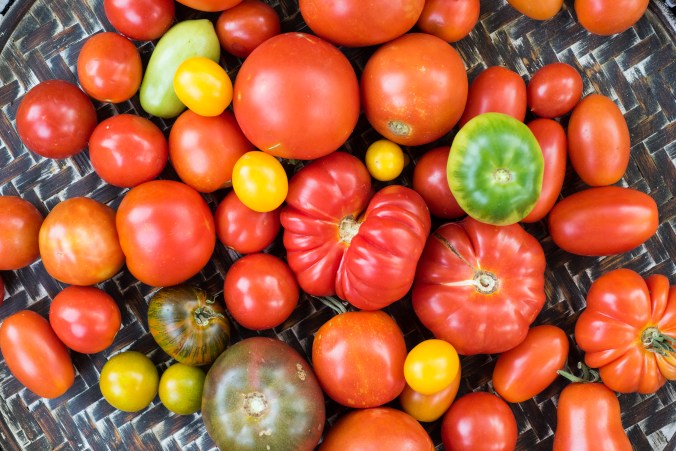
We continue our never-ending quest to absorb everything we can about all types of farming, and just in time for America’s most revered Day of Gluttony, N and I learned how to harvest, sort and process cranberries! One of the farms we worked on in Oregon was home to three organic cranberry bogs, so we were able to see firsthand how this unique fruit is both grown and harvested.

NJB_1166

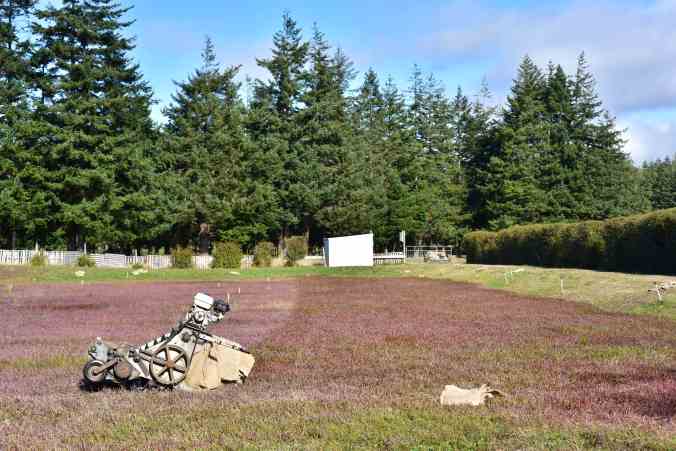
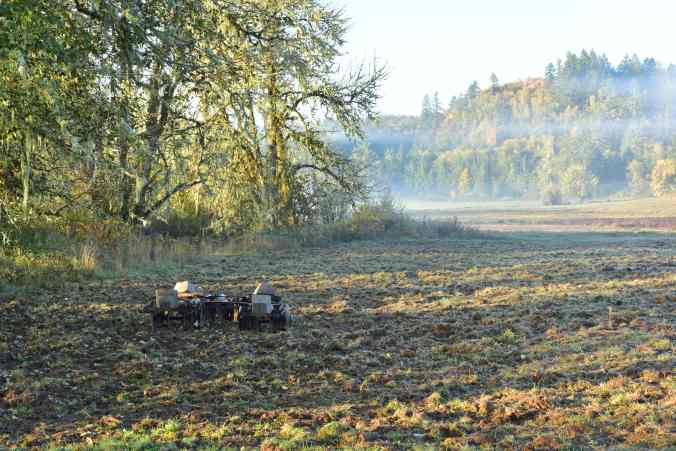
A one-acre dry cranberry bog with harvester. The portion on the left still needs to be harvested, while the section on the right is finished. 

Cranberries are grown in Washington, Oregon, Wisconsin, Massachusetts and New Jersey, as well as in Canada; they’re a low-growing vined shrub and the plants can live indefinitely if cared for properly. The vast majority of cranberries are conventionally wet-harvested, in the traditional bog we know from the Ocean Spray commercials. The organic farm we worked on, however, used dry harvesting. This is substantially more labor-intensive and has lower yields, but organic dry-harvested berries sell for nearly twenty times the amount that conventional wet-harvested berries do. This is primarily because dry cranberries can be sold fresh, packaged into bags in your produce department. Wet berries need to be processed into juice or other cranberry products almost immediately.

NJB_1160

Aren’t they gorgeous? And so good for you. I ate a lot.

NJB_1114

The harvester at work.

NJB_1164

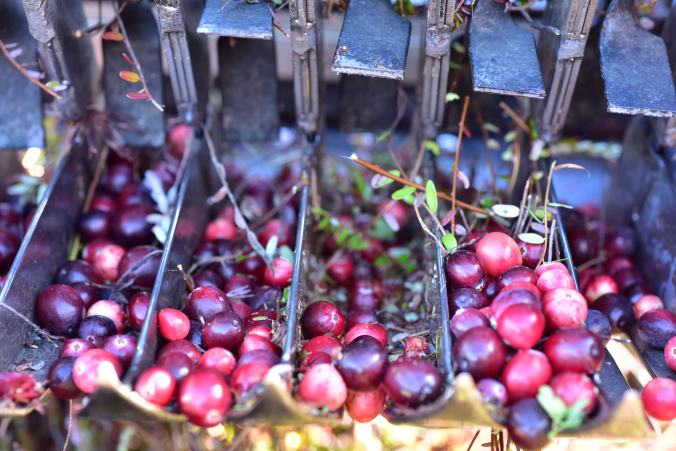
The harvester removes a lot of branches, but not all.

NJB_1141

We filled burlap sacks with berries for transport to the packing shed.

NJB_1225

A surprising number of cranberries are left behind after harvesting.

We followed our farmer with clean, dry burlap sacks, ready to replace the one on the harvester as soon as it was full. It’s really important not to overpack the bags and not to double-stack them on the trailer, as too much pressure will crush the berries and render them unsaleable. I hand-harvested a few pounds of berries left behind; this was unbelievably labor-intensive. Agricultural work is not for the faint-of-heart.

NJB_1245

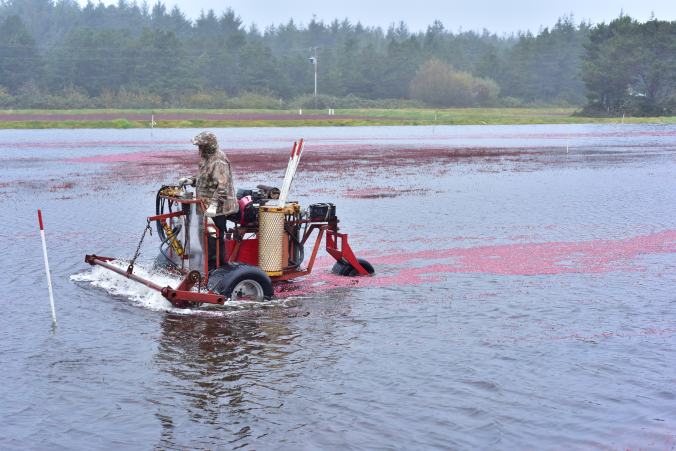
Traditional wet-harvesting involves flooding the bogs and a harvester like this one.

NJB_1246

The berries float to the surface of the flooded bog, where they can be easily scooped. 

We watched a traditional farmer wet-harvest his bogs on a miserably cold, rainy day: not at all fun. Our farmer can only harvest when it’s dry and clear, as the goal is for the berries never to get wet. Even the morning dew had to dry before we could harvest.

NJB_1239

Our daily harvest, ready to be put through the sorter.

Every day after we harvested, we took our berries to a shared packing shed. Our farmer ran the berries through the sorter, and N and I sorted and packed on the opposite side. Once the berries started tumbling through the chute on our side, we really had to work quickly to keep up, and to ensure that our crates didn’t get too full. As with loading the bags during harvest, it’s essential not to crush the berries on the bottom.

NJB_1241

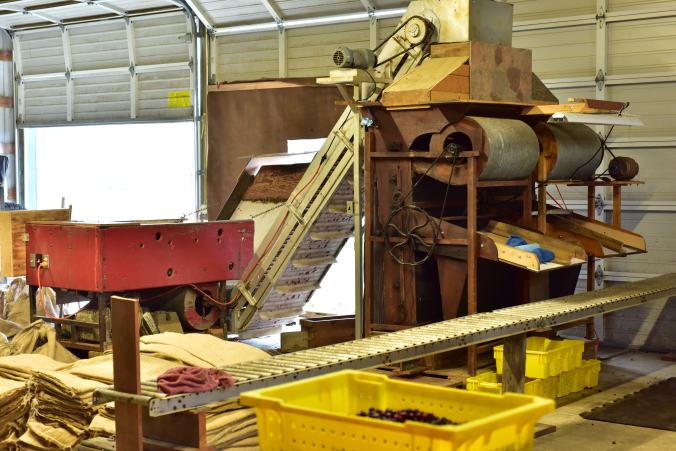
Berries are run up the conveyor belt, where they’re tested for ripeness.

NJB_1250

We stood here and sorted through the berries as they came down the belt, removing small branches, twigs, leaves and any damaged berries.

Unusually for most produce, cranberries actually bounce when they’re ripe (and float when they’re flooded), so the sorter both removes the larger vines and branches and tests the cranberries for ripeness. Berries that don’t make the cut are dropped into the yellow crates down below, and they’ll eventually be fed to pigs – just like our apple cider waste.

NJB_1211

Berries that are split, crushed or otherwise open need to be removed, or they’ll spoil.

NJB_1249

Each crate holds about fifteen pounds of fruit after sorting.

Once our cranberries were sorted into the crates, they would be sent to a central distribution center, where they would be sorted again, washed and bagged. And then they’ll be on the shelves at your local grocery store!

IMG_0976

Only in cranberry country would you see fresh cranberries in bulk; mostly they’re sold pre-bagged.

I grew up in a household where the only “cranberries” we ever saw were in the exact shape of the can they came in. Once I discovered fresh cranberries, I always wondered why Americans only seem to use these once a year. They’re tart, crisp and delicious, and high in vitamin C, fiber and antioxidants, among numerous other health benefits. They’re delicious in oatmeal, baked goods, smoothies and of course as a condiment for roast turkey, goose or ham. Plus, they freeze beautifully, so buy a few extra bags when they’re on sale, and use them throughout the year. They’re great dried, too, but be aware that Craisins and other sweetened dried cranberries can contain as much as 85% sugar by weight, so they’re not nearly as healthy as you’d like to think. Buy unsweetened dried cranberries whenever possible. Oh, and “cranberry juice cocktail”? More sugar than soda. Don’t ever, ever drink it.

Cranberry sauce

Making your own cranberry sauce is by far the easiest thing you’ll prepare for a holiday dinner, and you can do it well in advance. Rinse one bag of fresh cranberries and place in a medium saucepan. Add about 1/2 cup water or orange juice (or Grand Marnier, if you’re feeling flush), a pinch of salt, the grated rind of two oranges or clementines, a bit of grated fresh ginger (or 1/4 tsp. powdered ginger) and about 1/4 cup brown sugar or honey. Simmer gently to allow the cranberries to burst, and stir occasionally to keep the sauce from sticking. Cook over low heat for about fifteen minutes or so, or until the sauce is the consistency you’d like, adding more liquid if needed. Taste and adjust the seasoning. I like to keep my cranberry sauce super-tart because I love the flavor and don’t like things overly sweet, but feel free to add more sweetener if you like. The sauce will thicken once refrigerated and will keep in the fridge for at least two weeks. I keep it thick and use it as jam on toast, too!

Need more inspiration for fresh cranberries? Go here.


Going nuts, vol. 2

We started the year learning about macadamias in New Zealand, so it’s only fitting that we should close it out harvesting chestnuts in Oregon. Prior to marrying an Englishman, I had never eaten a fresh chestnut – only candied, at culinary school in France – but they’ve become part of our fall traditions, as they were for him in childhood. And now that I’ve harvested them myself, I truly have a newfound appreciation for their exorbitant price. These things are little monsters.

NJB_1272

The trees in the grove we harvested are between fifteen and twenty years old.

Chestnut trees are grown across much of the world; chestnuts themselves are important food crops in Asia and Europe. Chestnuts were also hugely valuable to native Americans and early settlers; the fruit is primarily carbohydrates, has more starch by weight than potatoes and contains enough vitamin C to prevent scurvy. In the early 1900s, however, the Bronx Zoo imported Asian chestnut trees for their botanical collection and inadvertently introduced chestnut blight to North America. Within forty years, the blight wiped out nearly every single one of the forty billion chestnut trees in America, with only a few small isolated stands now remaining across the country.

NJB_1275

Usually you’ll find three chestnuts in the burr, but it depends on the species.

The actual chestnuts are contained in a burr, or hull, which is exactly like a tiny, angry porcupine. When the chestnuts are ripe, the chocolate-colored burrs fall to the ground; unlike other fruits or nuts, chestnuts are never harvested directly from the tree.

NJB_1279

Ripe burrs split open, as on the left.

The burrs split open on their own, further indicating ripeness; this is primarily due to soil humidity, as chestnut trees prefer more humid climates. Sometimes unripe (green) burrs will also fall, and if they haven’t opened they should be left to ripen further.

NJB_1271

Dry leaves and empty burrs after harvesting.

Things to know when harvesting chestnuts: you’ll need gloves. Kevlar gloves, to be precise, and yes, that is the material used for bulletproof vests. These things look relatively harmless but are truly vicious, and good gloves are mandatory. And it will take you ages to harvest these; the little burrs love to hide in the huge piles of dry leaves that have also fallen from the tree. They’re like adorable, spiky landmines, and now I know personally why they’re criminally expensive: the pain level is extraordinarily high. (I’m almost certain they were used as extras in this film.)

NJB_1262

Looks harmless. Isn’t.

These edible chestnuts aren’t to be confused with horse chestnuts, which are mildly toxic to humans, or water chestnuts, which are grown aquatically and used in Asian cuisine. Attempts have been made since the 1930s to hybridize the American and Asian chestnut trees, in order to create a native species resistant to blight, but it hasn’t as yet been hugely successful. (On a related note, we’re about to suffer another major loss of trees, as the emerald ash borer – also imported from Asia, on shipping pallets this time – continues its trail of destruction across America. Colorado alone is projected to lose more than two million trees.)

NJB_1261

It took forever to harvest a three-gallon bucket!

Chestnuts are used in savory and sweet preparations all over France and Italy; as with cranberries, they’re commonly seen in holiday recipes because their harvest time coincides perfectly. And in wintertime in cities like London or New York or Paris, you’ll often find street vendors roasting chestnuts over repurposed fifty-gallon oil drums.

NJB_1284

To roast fresh chestnuts at home, carefully cut an ‘X’ into the flat side of each nut. Use sturdy kitchen shears to do this and be very, very careful; the nuts are slippery and unwieldy. Place on a baking sheet and broil until you hear the first explosion, about ten minutes depending on the quantity and your broiler temperature; be patient and wait until the second explosion, which indicates that all of them should be cooked through. Open the oven carefully and quickly lay a kitchen towel over the entire tray as more explosions are likely to follow. Let cool until you can safely handle them, then peel and dip each nut into coarse salt and enjoy. (Sorry about your oven; you’ll probably need to clean up the shrapnel once it’s cooled down. And a pro tip: it’s not a great idea to roast chestnuts in someone else’s oven, unless you’re also willing to clean it.)

NJB_1290

Although chestnuts seem to thwart you at every turn, the reward is well worth the potential injury. Roasted chestnuts pair perfectly with a wee snifter of bourbon and are even better if enjoyed in front of a roaring fire. Take pleasure in the simple things, friends, and clean up the oven later.

Cider days

Gather round, kiddos, and let your crazy old auntie tell you stories about what people did down on the farm when they didn’t have these newfangled modern conveniences like “wifi” and “television” and “an actual life.” We participated in fun old-timey group activities like apple pressing, yes we did. And we have the photos to prove it.

NJB_0997.JPG

First, start with apples.

Grassward Dairy had about a dozen mature apple trees on the property; I felt especially silly because we went grocery shopping prior to our stay there and I bought apples. Like spent actual money! And there were thousands of delicious apples, free for the taking.

NJB_1028

This press is pretty old-fashioned…except that it’s partially electric, so shredding the fruit is quicker and easier.

NJB_1040

One of many important foods pollinated entirely by bees.

For best results, use a mix of different apples so your cider is a balance of tart and sweet. And you don’t have to worry about bruised spots or any other damage, as the press takes no prisoners. Throw them all in.

NJB_1010

An action shot of an apple hitting the toothed shredding wheel. 

NJB_1012

The shredded pulp before pressing.

NJB_1014

Gravity forces the pulp into a mesh bag for pressing and straining.

NJB_1018

Readying the pulp for pressing.

NJB_1020

Placing the weighted lid on the bag.

NJB_1003

The electricity only helps with the shredding wheel; the press is still cranked by hand.

njb_1022.jpg

Leftover pulp is fed to the pigs. It’s like pre-marinating.

NJB_1001

And the result of all this hard work? The most incredible apple cider you’ve ever tasted.

NJB_1025

We pressed hundreds of pounds of apples; most of the juice was left for drinking fresh, but a few gallons will be turned into hard cider. Sadly, it won’t be ready for weeks, so we won’t be able to taste the fruits of our labors. (P.S. You can do this at home using a juicer…but it’s much more authentic if you’re fighting off aggressive wasps outside on a farm.)


The Farm Series: Grassward Dairy

Well, hello there. We’re at this moment in Oregon, volunteering on farms and trying to determine if Quiet Farm wants to be born in this place. We planned to spend a month on one particular small goat dairy, but as we know from previous adventures, travel plans don’t always work out exactly as envisioned. So we ended up living in a vintage trailer (oh, the memories) for ten days here at Grassward Dairy, a micro-creamery just outside of a college town we know and love (go Beavs!).

NJB_0979.JPG

The farmers have to cross a road twice a day to move the cows for milking.

We’ve now worked and/or volunteered on more than half a dozen farms around the world, and every single one is different. Grassward Dairy sits on about one hundred rolling acres along Mary’s River in the southern stretch of the Willamette Valley; in addition to the three milking cows, there are ducks, laying hens, beef cattle, sheep, a donkey, a llama and a rambunctious cattle dog-in-training.

NJB_0713.JPG

Harold, on the left, and Hazelita are being raised for meat. Hand-feeding them collards and chard was one of the highlights of our time here.

NJB_0810.JPG

Cows on their way to the barn for the evening milking.

NJB_0970

It doesn’t always rain in Oregon.

NJB_0759.JPG

We cleaned out the tomato and pepper plants from this 100-foot hoop house, then prepped and reseeded the beds with winter greens.

NJB_0799.JPG

The guard llama and her flock.

Every farm is unique, and every farm’s business model is unique, too. Grassward Dairy offers a dairy CSA, which means that customers pay a fixed price each month in exchange for fresh raw milk, yogurt, cheese, butter and cream. In this agricultural part of Oregon, it’s easy to eat local just about all year.

NJB_0867.JPG

Terry the rooster, with one of his ladies. Muscovy ducks and Florencia the guard donkey can be seen in the background.

NJB_0766.JPG

Hattie, looking regal and proud.

NJB_0913

Disking one of the pastures in preparation for cover cropping. While we were there, heavy rains swelled the river and flooded this pasture, among others.

NJB_0824.JPG

The evening milking.

The more time we spend on farms, the more we know this is the right path for us. Many thanks to the team at Grassward Dairy for letting us be part of their farm family for a short time. And if you’re in the area, you can stay there too!


Eating healthy on the road

Oh, the quintessential American road trip. Our country’s iconic open highways have been immortalized in so many classic movies, like when we thought “the Rocky Mountains would be a whole lot rockier.” Or perhaps you need to bootleg a few Coors Banquets from Texas to Georgia? Maybe two legendary ladies in a ’66 T-Bird is more your style? Whatever your favorite road trip film might be, there is no arguing that eating healthy while driving American highways is no easy feat.

IMG_20171014_101120147

Hello Wyoming, and thanks for inventing cruise control. (Photo may have been taken in 1987 or 2017. With filters, who knows?)

I like to move food. It’s my thing. Whenever we leave our house, it’s a guarantee that there are a few canvas shopping bags and maybe a plastic tub or two stacked by the door. We go to my sister’s for dinner and I bring jars of homemade applesauce, fruit leather for my niece (also known as “repurposed jam”) or gorgeous cheese from these lovely folks. My book club ladies leave with end-of-the-garden produce, dinner leftovers and more cheese. And if we’re off on a trip, whether by car or by plane, I simply will not be held hostage by the American industrial food complex.

IMG_0764

Mmmm…McDonald’s or Cinnabon? Why not both?

The vast majority of food in this country is based on two key ingredients: corn and soy. We are very, very good at growing corn and soy, and even better at turning it into cheap meat, soda and processed food. And these “edible foodlike substances” are most of what’s on offer at your standard convenience store or truck stop. And to add insult to injury, it is absurdly priced! I will not play by those rules.

IMG_20171016_204714

Example A, above. Look! It’s a $2.79 “meal replacement bar!” You know, so we don’t have to eat an actual meal! Can you read the first ingredient? It’s soy protein isolate. The second ingredient is sugar, and the third is soluble corn fiber. If all of your standard meals are composed of soy, sugar and corn, then by all means, please choose this as a meal replacement. But this is just one of many examples of a giant, powerful marketing machine that has convinced the American public that we 1. don’t have time to cook and 2. can eat some junk like this with “PROTEIN” printed in large font and call it a meal. No, no and no.

IMG_0760.JPG

Absolutely no actual food was harmed in the making of these edible foodlike substances.

If you’re on a road trip, whenever possible get off the highway and into a town supermarket. Gas stations, convenience stores and truck stops are by their very nature stocked with cheap, non-perishable food, so that’s what you’ll buy. Their staff has neither the time or inclination to stock and then dispose of fresh fruit, vegetables and meat, so instead you’ll encounter a display like the one above. If you can make it away from the interstate and into a small grocery store, you’ll hopefully have access to a much better selection of food.

IMG_20171015_122515762

I genuinely pity the poor animals who died to make these “meat sticks.” (Also, “thungry?” Is this like “hangry?” Notice that it’s trademarked.)

NJB_0687.JPG

Part of our road trip survival kit.

So what’s a person to do in the face of this pretend food trash? Easy answer: plan in advance. Just like cooking healthy food at home, eating well on the road requires a bit of time and planning. But if you’re already doing other pre-road trip tasks like checking your tire pressure and refilling your windshield wiper fluid, why not get some healthy food in order? For me, it’s mostly shelf-stable items, plus a few perishables in a cooler. My basic road trip essentials, most of which are easily found in the bulk section of a good supermarket:

  • stellar cheese and good crackers are mandatory
  • dried fruit, including figs, apricots and homemade fruit leather
  • fresh fruit that can last, such as citrus and apples (no berries or bananas!)
  • homemade granola, to eat on its own or with purchased yogurt
  • jerky, either homemade or from well-raised animals
  • nuts, which for us are typically roasted salted almonds
  • rice cracker mix, pretzels or other reasonably healthy salty snacks
  • homemade granola or energy bars, or packaged bars with clean labels (be able to pronounce and understand every single ingredient, and the first three ingredients shouldn’t be soy, sugar and corn)
  • good-quality dark chocolate, preferably without soy lecithin

And for equipment:

  • without question, a good chef’s knife and paring knife, protected in sheaths, and a small polypropylene cutting board.
  • we bring our own coffeemaker, grinder, beans and mugs. We sleep cheap, and I’m not drinking Motel 6 coffee. Not negotiable.
  • cutlery rolls, which include an inexpensive metal fork, knife, spoon, reusable straw and corkscrew. We don’t use single-use items, with the exception of compostable paper napkins.
  • Mason jars with screw-top lids and a few plastic containers. These can be used for drinks, storing snacks or to eat meals.
  • a wooden spoon, rubber spatula and metal tongs
  • a small electric burner plus a frying pan and mini stockpot. This makes meal prep on the road easy – and more importantly – possible.

In all honesty, at various stops along this trip I did notice small containers of cut fresh fruit, hardboiled eggs and some seemingly fresh sandwiches and wraps, which indicates that demand is shifting. But there is no guarantee that every gas station will have these, and if you pack your own food you’ll have a much better selection and save a ton of money. I saw two packaged hardboiled eggs priced at $1.99; with a cooler and ice packs, a dozen well-sourced hardboiled eggs, flaky salt and hot sauce can easily be brought along for about $4 and a few minutes’ work in advance. There is simply no one thing you can do to improve both your physical and financial health more than planning, cooking and bringing your own food. Enough said.

Friends, please remember that your health is your responsibility, and what you choose to eat makes a huge difference in your health. Take some time prior to your next trip and bring food along, and stand in opposition to a system that insists you have to eat what it offers.


Cooking Class: Chiang Mai, Thailand

We’re excited to be headed out on the road again, and in that spirit we wanted to revisit some of our favorite moments from our adventures earlier this year. Some weeks back, we shared a cooking class we had taken in Udaipur, India. And as we’re in nostalgia mode, and I’ve got Thailand on my mind since I just spent time talking to a friend about his trip, let’s return to Chiang Mai and a fabulous cooking class we experienced there. Like our Indian class, this day out was one of the highlights of our trip to southeast Asia.

Thai dessert bowl

Looks like Thai green curry, but it’s actually dessert: sweet rice pudding with bananas and coconut milk.

Thai rice market

Dozens of varieties of rice are for sale at the market.

Thai ingredients market

Fish sauce, a key ingredient in southeast Asian cooking.

We started our cooking class at one of the many local markets, where we sampled various ingredients and drank cold, sweet Thai iced coffee. While the cooking school has an extensive garden and grows many of their own herbs and spices, they still need to shop for a few things. Many Thai homes don’t have refrigeration, so shopping each day for fresh ingredients is both a pleasure and a necessity.

Thai cooking tables

We’ll grind our curry pastes and chop our ingredients here.

We left the market and traveled by minibus to the school, where we were offered iced jasmine tea and given a tour of the property. The cooking school is perfectly set up to accommodate guests, with spaces for prep, cooking and eating together.

Thai garden chilies

Tiny, fiery Thai bird chiles. Typically, the smaller the chile, the bigger the punch.

Thai ingredients basket

Fresh herbs and aromatics, just harvested.

The cooking school has acres of gardens, where they grow lemongrass, basil, coriander, mint, galangal, ginger, kaffir lime, chiles and many other ingredients for their classes.

Thai cooking kitchen

Our indoor-outdoor kitchen, with cooking stations set up for each student.

Thai ingredients board

Thai ingredients bowls 01

Thai ingredients bowls 02

All of the components for the recipes we would make in class were neatly laid out for us. I emphasize this classical French technique a lot in my own cooking classes: it’s called mise-en-place, and it literally means “to put everything in its place.” When you’re cooking, assemble all of your ingredients like this in advance; it may seem tedious and time-consuming, but it actually makes preparing your dish much, much easier. Trust me.

Thai cutting board spoon

Fresh herbs and tamarind paste, like fish sauce, are key to classic Thai cooking.

Thai pestle mortar table

Although you can of course make curry paste in a blender, traditionally it’s prepared in a stone mortar and pestle.

Thai pestle mortar

Grinding aromatics for red curry paste.

Thai wok stir-fry veg

A wok allows for quick, high heat, so vegetables and proteins remain crisp and fresh.

Thai wok stir-fry tofu

Pad thai, a favorite Thai dish. In Thailand it’s not quite as sweet as it often is in America.

Thai red curry

Vegetarian red curry soup. Good Thai food is most often a delicate balance of hot, sour, salty and sweet.

Craving some Thai food after reading this? Me too. Try here, here or here. And if you have the chance, definitely book a cooking class on your next adventure. It’s well worth the time and money to cook and eat like a local, if only for a few hours.

On the road again + best travel tips

It’s early October, cool and crisp. N and I have been home from our round-the-world adventure for about four months, and it’s time to go again. We’re at the moment in a flurry of last-minute preparations to head to Oregon for a month, where we’ll volunteer on another goat dairy. This trip is quite a bit easier than the last one: no worrying about visas or passports, no cramming everything into just one bag, plus we’ll only be gone for one month, instead of five. But in the spirit of adventure, we thought we’d share some of our most useful travel tips, gleaned from nearly two decades (!) of short- and long-term travel.

Travel Books.jpg

There are vacations, and then there are trips. One could argue that a trip is a bit more serious than a vacation; it might last for more than a month and involve a committed disentanglement from the everyday world. And nowadays, with opportunities for remote work increasing, it’s more likely that you might be able to swing that four-months-or-more abroad plan you’ve been ruminating on for ever so long. Below, our most useful tips for those of you who might be thinking about making the leap from a standard holiday to a trip.

  • Identify – roughly, at least – what you expect to get out of your travel. If you’re just traveling to capture Insta followers or get paid for blogging, fair enough. Or if you’re running away from a difficult situation, be honest about that, too. But don’t go traveling without at least a reasonably clear idea of what you hope to accomplish. Any less, and you’re asking the travel itself to do all the work. You have to show up, too.

Travel Blur.jpg

  • Make a budget. Then increase it by 25%. The old adage goes like this: “Lay out everything you think you need. Then take half that and twice the money,” and it holds true. For our five months overseas, we budgeted generously for two adults and still went over that number by 20%. They may say that the best things in life are free, but the truth is that travel costs money, and there is no glory in arriving back in your own country completely, totally broke. Account for the unexpected; for us, that was the high cost of point-to-point travel in Japan and unexpected gratuities required literally everywhere in India.
  • Ensure your passport is valid for at least six months beyond your return date. This seems like a surprisingly obvious tip, but you’d be amazed at how many travelers are caught out by it. Different countries have different requirements, but having at least six months’ validity, plus at least three or four blank pages, in your passport will make border crossings much easier.

Travel Diary.jpg

  • Please, research your destinations – and their visa rules – before you go. Again, different countries have different requirements and all of this information can easily be found online, most likely through your home country’s government. “I didn’t know” is simply not a valid excuse at any international border crossing.
  • Also, do a bit of research on your destinations and their customs. In many countries, it’s not appropriate to show shoulders and/or knees. Women might be expected to cover their heads. Certain countries may only eat with the right hand. Knowing this in advance can save a lot of awkwardness once you arrive, and you should always, always be respectful of the customs of the country you’re visiting.

IMG_20171011_095945299.jpg

  • If possible, sign up for a debit card that reimburses ATM fees. In the U.S., Charles Schwab provides some terrific options that can save you a lot of money. Find out if any banks in your country offer similar programs because ATMs are simply the very best way to withdraw local currency and avoid usurious fees. Money changers – especially in airports and train stations – should be used as an absolute last resort. (Thanks, India, for only having broken ATMs in your airports so we were forced to use money changers.)
  • Get travel insurance, and know its limitations. There are a number of great plans out there, but they vary enormously based on your home country and where and how long you plan to travel for. Do your research and don’t skimp on the essentials, and make sure you understand what will be covered if you’re required to be repatriated to your home country for additional treatment. Oh, and know that you’re rarely, if ever, covered for high-risk activities like skydiving, bungee jumping and so on.

Travel backpack.jpg

Five months in just one backpack each.

  • Pack less than you think you need, and buy your travel clothes at your local Goodwill or op-shop. It sounds counterintuitive, but you actually need far less for travel of more than two weeks than you do for a standard holiday. Bring some concentrated biodegradable laundry soap, and get used to washing your smalls in a hostel sink. Pegs and a simple washing line come in handy, too. Don’t take any article of clothing that you absolutely treasure – my favorite jumper is lost forever somewhere on an Indian train, or hopefully keeping someone else warm. You can always buy things on the road and donate what no longer serves you.
  • Ziptop bags, duct tape, safety pins and a small sewing kit are absolute necessities. If there is one thing that long-term travel teaches you, it’s to be resourceful with what you have. Especially if you’re traveling extensively in underdeveloped countries, you’ll find that things we take for granted at home aren’t always available. Being able to successfully repair your own kit is good for the wallet and the psyche.

TajMahal 1.jpg

Oh, this? Just doing a few renovations at our summer cottage.

  • Identify your priorities, and leave the rest to chance. In any country, there will be a few must-sees. Choose your top two or three mandatory sights, and let the rest of your trip happen as it will. Serendipitous travel moments rarely occur when every single second is carefully plotted out.

Above all else, go. Don’t let this or any of the billions of other pre-travel posts out there scare you – just go. There are few experiences in life as enriching as long-term travel and it will change you in ways you never even knew were possible. Grab your passport and your backpack and get out there. The world needs you.


Hive inspection

Back in late July, we showed some photos of our beehive. A few weeks later, we opened the hive again for a summer inspection and wanted to share those pictures here too. As we’ve said before, we’re new to beekeeping, but we’re learning more every day.

Equipment.jpg

Necessary equipment: veil, smoker, pry bar and support frame.

Smoker Ignition.jpg

Lighting the smoker.

Smokers are commonly used by beekeepers when opening and inspecting hives. The smoke is thought to dampen the guard bees’ pheromone response, allowing the beekeeper to open the hive without a defensive reaction. This does not mean, however, that beekeepers don’t get stung – but the goal is to minimize the stings, because those are harmful not only to the beekeeper but obviously to the hive, too, as the bees die once they’ve stung. Good beekeepers want to reduce unnecessary bee death whenever possible.

Smoker Entrance

Smoking the hive in preparation for opening.

Hive Opening.jpg

Carefully opening the hive. (I am very helpfully holding an enormous sunflower stalk out of the way.)

Beekeepers traditionally wear white because large predators of hives – bears, raccoons, skunks – are overall dark in color. It is thought that the bees will be less stressed, and therefore less likely to attack, if the beekeepers are clothed in white. In South America, however, beekeepers most often wear red.

Honey Super.jpg

The inner workings of our Langstroth hive.

Frame Opening.jpg

Removing the frames one by one.

Frames 02.jpg

It is such a thrill to see so many healthy, thriving bees!

Frame Inspection 05.jpg

Frame Honeycomb.jpg

Honeycomb! We’ll leave some for the bees’ winter food supply, and hopefully there will be enough for us, too.

Frame Inspection 06.jpg

Can you spot the queen? I couldn’t.

Hive Open.jpg

Our hive without its top box and cover.

Hive Closing Up 02.jpg

Closing up the hive.

We’re hoping we’ll be able to harvest some of that gorgeous honey you saw above in a few weeks, before the weather turns. Stay tuned!

P.S. Jim, you’re the best. We couldn’t do this without you. Thanks!


Cookbook Club: Full Moon Suppers

It will come as precisely no surprise to any of you that I have what some might consider an excessive cookbook collection. I try to keep it pared down – honestly, I do – but then every October the local library has their annual book sale where you get to fill shopping bags for $6 each and I just lose any ability I might once have had to act like a rational adult. It’s true. And no one will ever, ever help us move.

Peach Cake Cook Book.jpg

Not long ago, this cookbook crossed my path, and it is pure and simple and lovely. As a professional chef, I know that most cookbooks are used by home cooks, and therefore I am infuriated (not too strong a word) by gorgeous, glossy, overproduced cookbooks with fabulous photos where the recipes don’t actually work. Home cooks, especially those just starting out, don’t need perfect photos of airbrushed superstars (or blog stars) happily munching on avocado toast. What they need are clear, easy to-understand recipes that have been tested many times, in many kitchens (preferably home kitchens), with variable equipment. And possibly not all of the correct ingredients.

Peaches Garden.jpg

The last of the season’s stone fruit. 

Annemarie Ahearn has been cooking and farming on her family’s property overlooking Penobscot Bay, Maine, since 2009. As she says,

“I had not moved to Maine on a whim. My plan was to open a cooking school for home cooks and teach people how to grow a kitchen garden. The mission of the school aligned with my personal ambition, which was to fundamentally change my daily routine. City life, while rich with professional opportunity, did not feed my soul in the way that I was hoping a more rural life would. And what better place to experience nature than on a farm, nestled between the mountains and the sea? So many skills that my grandmothers and generations prior to theirs possessed I did not know the first thing about. Chopping wood for warmth, putting up preserves for winter, catching a fish for dinner and raising laying hens for eggs were all efforts that I wanted to experience firsthand.”

The book is broken into twelve menus, appropriately themed to the twelve months of the year. Her recipes are simple, seasonal and easy to follow, and every single one pays homage to the land above all else. I can’t get the quality of Maine lobster that she has, nor fresh periwinkles, but there are plenty of recipes here that could easily be made across the country, depending on the season. We haven’t been to Salt Water Farm (yet), but we feel a definite kinship between the cooking and farming life Annemarie has forged for herself on Maine’s rocky, windswept coast and the cooking and farming life we want to build at Quiet Farm, wherever that may be.

Tomatoes Green.jpg

Please ripen before first frost hits…

I’ll be completely honest and say that I’m a little late on this post, but truly that’s only because I was (im)patiently waiting for our tomatoes to ripen so I could make a glorious summer salad. Salt Water Farm has a short growing season too; they treasure their warm-weather peaches, tomatoes and corn just as we do at nearly six thousand feet in the Rocky Mountains. You work with what you have.

Lovage G&T.jpg

Cocktail hour is my favorite hour!

Each of the twelve menus in Full Moon Suppers starts with a paired beverage. N and I really only partake of gin-and-tonics in summer; they seem to suit the weather so well. I’ve seen a couple of recipes this summer encouraging the use of lovage in a simple syrup to add to G&Ts or sparkling water; since I have an abundance of lovage that I leave for the bees every year, I thought I might as well use it. The syrup is truly simple: combine two cups water, two cups sugar and bring to a boil. Add eight cups roughly chopped lovage, remove from heat and allow to cool completely while lovage steeps. Strain into a clean quart jar and store in refrigerator. It’s herby, grassy and deeply refreshing, whether in a cocktail or sparkling water. I’m surprised by how much I like it.

Tomatoes Tray 02.jpg

Tomato Cucumber Salad.jpg

I know that I said previously that once you finally have ripe tomatoes, you should only anoint them with olive oil and salt. But really, you should also find some amazing local sweet corn (I froze all my excess from this event) and some fresh cucumbers and you should make this salad. It has a simple vinaigrette made with lemon and mustard and honey and red wine vinegar, and honestly, it tastes like summer in a bowl. This is not a salad you’d make any other time of the year – only when the ingredients are at their absolute very best. And that window of opportunity is very swiftly closing.

Peach Cake Recipe.jpg

Peaches Tray.jpg

And then there’s the peach cake, although in my world it’s a peach and nectarine cake, plus I added almonds to complement the almond flour and for extra crunch. Oh, and I just served it with mascarpone rather than sweetened whipped cream. (It’s exceedingly difficult for me to follow recipes exactly.) But this one is worth the time and effort, and even though it takes forever to bake, you’ll be rewarded. The butter creates a gorgeous, rich crust, but the interior is as soft as a dream. And this would work beautifully with home-canned peaches, too, should you be so inclined, so you can make it more than two months of the year.

Peach Cake Uncooked.jpg

Peach Cake Cooked.jpg

Peach Cake.jpg

Peach Almond Cake with Mascarpone

Chef’s Notes: As mentioned above, I included 1/2 cup slivered almonds in the batter; incorporate these with the dry ingredients in the first step. I used a combination of ripe peaches and nectarines, and I served the cake with just a dollop of this plus additional sliced fresh peaches and nectarines on the side. No additional alterations are needed to bake this cake in the Denver area, although above 7,000 feet you may wish to make adjustments. This cake counts as breakfast, in case you’re wondering.

For The Cake

  • 1 cup all-purpose flour
  • ½ cup almond flour
  • ½ tsp. sea salt
  • 2 tsp. baking powder
  • 9 tbsp. unsalted butter, softened to room temperature
  • 1 heaping cup sugar
  • 3 extra-large eggs, at room temperature
  • 1 tsp. vanilla extract
  • ¾ cup cream
  • 4 large, pitted peaches, thinly sliced
  • 2 tbsp. melted butter

For The Cream

  • 2 cups heavy cream
  • 1 tbsp. sugar
  • ½ tsp. vanilla extract
  • ½ cup mascarpone
  • confectioner’s sugar for dusting
  

Directions

Preheat the oven to 375°. Line the bottom of an 8-inch springform pan with a round of parchment paper. Butter and flour the sides of the pan.

In a medium bowl, combine the all-purpose flour, almond flour, salt and baking powder. With a stand mixer fitted with the paddle attachment, whip together the butter and sugar. Incorporate the eggs one at a time, whipping well. Whip in the vanilla extract. Mix in a third of the dry ingredients, then a third of the cream. Continue alternating the dry ingredients and cream in thirds, scraping the sides of the bowl in between additions.

Pour the batter into the prepared cake pan. Spread the peach slices on top and press them into the dough. Brush with melted butter. Bake for 1 hour, or until the cake has set and turned golden on top. The cake is done when you insert a toothpick into the center and it comes out clean. Allow to cool on a rack; serve slightly warm or at room temperature.

Using your stand mixer fitted with a whisk, whip the cream with the sugar and vanilla extract until soft peaks form. Fold in mascarpone.

Serve slices of cake on individual plates with a generous spoonful of cream and a dusting of confectioner’s sugar on top.

(All recipes reprinted with permission from Full Moon Suppers at Salt Water Farm by Annemarie Ahearn and published by Roost Books, but the photographs are N’s!)

The Farm Series: Mountain Flower Goat Dairy

Part of our grand plan this summer, our transitional period between our round-the-world trip and our journey to find Quiet Farm, is to visit and volunteer on as many farms as possible. As we’ve said before, we can learn something from every single farm.

MFGD-01.jpg

We’ve volunteered on vegetable farms (both cold and warm) before, but because we’re virtually certain we’ll have goats, for meat and milk, on Quiet Farm, we wanted to spend some time with these lovely creatures this summer. And that brought us here, to Mountain Flower Goat Dairy in Boulder. Mountain Flower is a non-profit committed to a few different key goals that we respect wholeheartedly: community engagement and education, sustainable agriculture and humane animal husbandry, and land conservation. All of these are tenets we plan to incorporate into Quiet Farm.

MFGD-22.jpg

Smart, inquisitive, affectionate and productive…goats are popular for good reason.

MFGD-02.jpg

Mountain Flower Goat Dairy is a raw-milk goat dairy, the only one within the city limits of the Kingdom of Boulder. There is a lot of controversy surrounding raw milk; the sale of it is illegal in most states and dairies must often sell “herd shares” in order to operate legally. It’s important to familiarize yourself with both the pros and the cons before forming your own opinion on raw milk. In MFGD’s own words:

“The primary focus at Mountain Flower Goat Dairy is to provide a supply of the most gorgeous, clean, healthy goat milk possible while demonstrating to the public a working urban farm. We are the only dairy in the Boulder city limits and we are delighted to fill this food void for our community. We allow the public the opportunity to own a portion of our herd and thereby gain access to raw milk.

A spirited debate exists over whether raw milk should be made available to the general public or not. Raw milk advocates have an uphill battle to shatter paradigms that remain from a time when little was known about microbiology and modern refrigeration did not exist. We believe it comes down to a person’s right to choose what food to put into their own bodies. We make a point to keep informed on and involved in the issues related to raw milk. We encourage you to do the same.

We do what feels right to us. That is to raise goats the way nature intended eating grass and alfalfa, grazing in the fields, playing with each other, being loved by humans and eating organic grains. We milk our goats in a low-stress environment and treat their milk with the utmost care, cleanliness and respect.”

MFGD-29.jpg

Relocating to greener pastures.

Mountain Flower keeps about thirteen adult does on hand for milking at any given time. They breed most of these does every year and either keep the young to expand their own herd, or sell the kids to families or farms who will uphold their high standards. Some of the kids are eventually used as pack animals, or family pets, or for meat.

MFGD-06.jpg

Up you go, darling.

MFGD-10

Cleanliness is of paramount importance in any dairy operation.

MFGD-14

Small goat dairies may still milk by hand…

MFGD-08

…but milking by machine is much quicker and more efficient.

Dairy goats are milked twice per day; the amount of milk they produce varies wildly based on grazing availability, season, breed, weather and other factors. While it’s now common to find goat cheese in grocery stores and on restaurant menus, goat (and its related value-added products) have only been well-known in the U.S. for about forty years or so. Despite being the world’s most commonly-consumed meat, goats are a relatively recent introduction to American palates. Goat milk, yogurt and cheese are now easy to market, but goat meat is still a hard sell – and the honest truth of any dairy operation, no matter the animal, is that approximately fifty percent of the babies born will be male. That logically means slaughter for meat, a reality that we’ll fully accept on Quiet Farm.

MFGD-21.jpg

Pensive goats in thought, probably about how to escape their grazing pasture.

What we learned during our summer at Mountain Flower is that these are truly incredible animals. They are passionate and irascible and difficult and gorgeous and moody and infuriating and loving – just like humans. We learned that they remember you and your weirdly soft yet nubbly leather gloves and that there are few things more comforting than a doe leaning up against you for an aggressively affectionate scruffle. We acknowledge that the realities of raising livestock mean that they will eventually (hopefully) grace our table, and that we’ll be even more thankful for the gifts they’ve given us. We learned that we want these animals in our lives and on our farm.

MFGD-17.jpg

Fresh goat milk is truly amazing. Oh, and it makes incredible cheese, butter and yogurt.

MFGD-19.jpg

Ready for customers.

MFGD-34.jpg

The definition of “free range.”

MFGD-41.jpg

What’s going on over here?

MFGD-51.jpg

Come on! Who doesn’t want to cuddle that sweet face?

Know thy food, and know thy farmer. The more we learn about these animals (and farming in general), the more we want to know. Quiet Farm, here we come.

P.S. A huge thank-you to the wonderful team at Mountain Flower Goat Dairy for hosting us this summer. Catherine and Dennis, thank you for sharing your land. Michael, Maddie, Kallie and Ryen, thank you for showing us the ropes. Please come see us on Quiet Farm.

MFGD-03.jpg